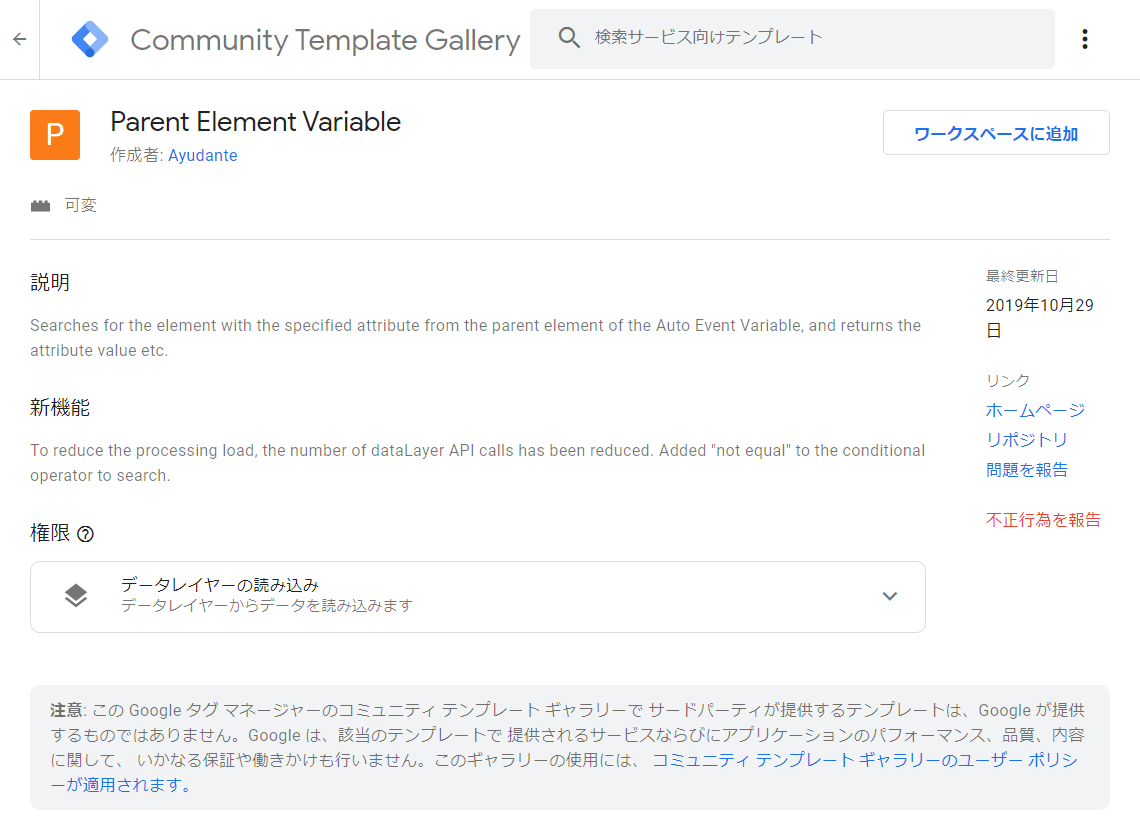
Googleタグマネージャのコミュニティテンプレートギャラリーへ、弊社作成の変数テンプレート「Parent Element Variable」が2019年10月24日に掲載されました。
せっかくですのでこの変数テンプレートについて、概要や使い方を紹介しますね。
The variable template “Parent Element Variable” was posted on the Google Tag Manager Community Template Gallery on October 24, 2019.
Here is an overview of this variable template and how to use it.
なおコミュニティテンプレートギャラリーは全世界向けに公開されているものですので、本記事についても従来の日本語と合わせて、英語も記載させていただきます。
少々読みづらいかもしれませんが、ご了承ください。
Since the community template gallery is open to the world, this article is written in English and Japanese.
Please understand that it may be a little difficult to read.
Parent Element Variableとは:What is Parent Element Variable
自動イベント変数が発生したタイミングで、対象の親要素のデータを取得するための変数テンプレートです。
例えば「必ずしもリンクURLを取得できるとは限らない『クリック-すべての要素』トリガーで、必ずリンクURLを取得する」ために使ったりできるほか、「親要素へ遡って、直近のIDを探し出す」こともできますし、「特定のclassを持つ親要素の指定の属性の値を取得してくる」などの使い方も可能です。
This is a variable template to get the data of the target parent element when an Auto-Event Variable occurs.
For example, it can be used to get the link URL using the “Click-All Elements” trigger. You can “go back to the parent element to find the latest ID”. It is also possible to use such methods as “get value of specified attribute of parent element with specific class”.
すでにコミュニティテンプレートギャラリーへ掲載されているため、どなたでもご自由にお使いいただけます。
Already posted to the community template gallery, anyone can use it freely.
- 主な使い道:Typical usage
- 「クリック-リンクのみ」トリガーが反応しないリンクで、Click URL変数でリンクURL(href)が取得できない場合
When the link URL(href) cannot be obtained with the “Click URL” variable of the link that does not respond to the “Click-Just Links” trigger. - リンクを含むブロックのidを知りたい時
When you want to know the ID of the block that contains the link. - 特定のIDやclassを持つ親要素の、別の属性値を取得したい時
To get another attribute value of a parent element with a specific ID or class.
- 「クリック-リンクのみ」トリガーが反応しないリンクで、Click URL変数でリンクURL(href)が取得できない場合
もともとは以前のカスタムテンプレートの紹介記事でサンプルとして掲載した「親要素から任意の属性値を取得するテンプレート」をベースに、コードの見直しや機能の追加を行ったものとなります。
A function was added by brushing up based on a template that gets an arbitrary attribute value from a parent element posted as an example in an introduction article of a previous custom template.
インポート方法:Import method
コミュニティテンプレートギャラリーへ掲載されていますので、インポートはとても簡単です。
GTMの管理画面内から、常に最新のテンプレートをインポートできます。
Importing is very easy because it is posted in the community template gallery.
You can always import the latest template from the GTM management screen.
- Parent Element Variableを使用したいGTMコンテナを開く
Open the GTM container that uses the parent element variable
- 左メニューの「テンプレート」からテンプレートの一覧画面を開く
Open the template list screen from “Templates” in the left menu.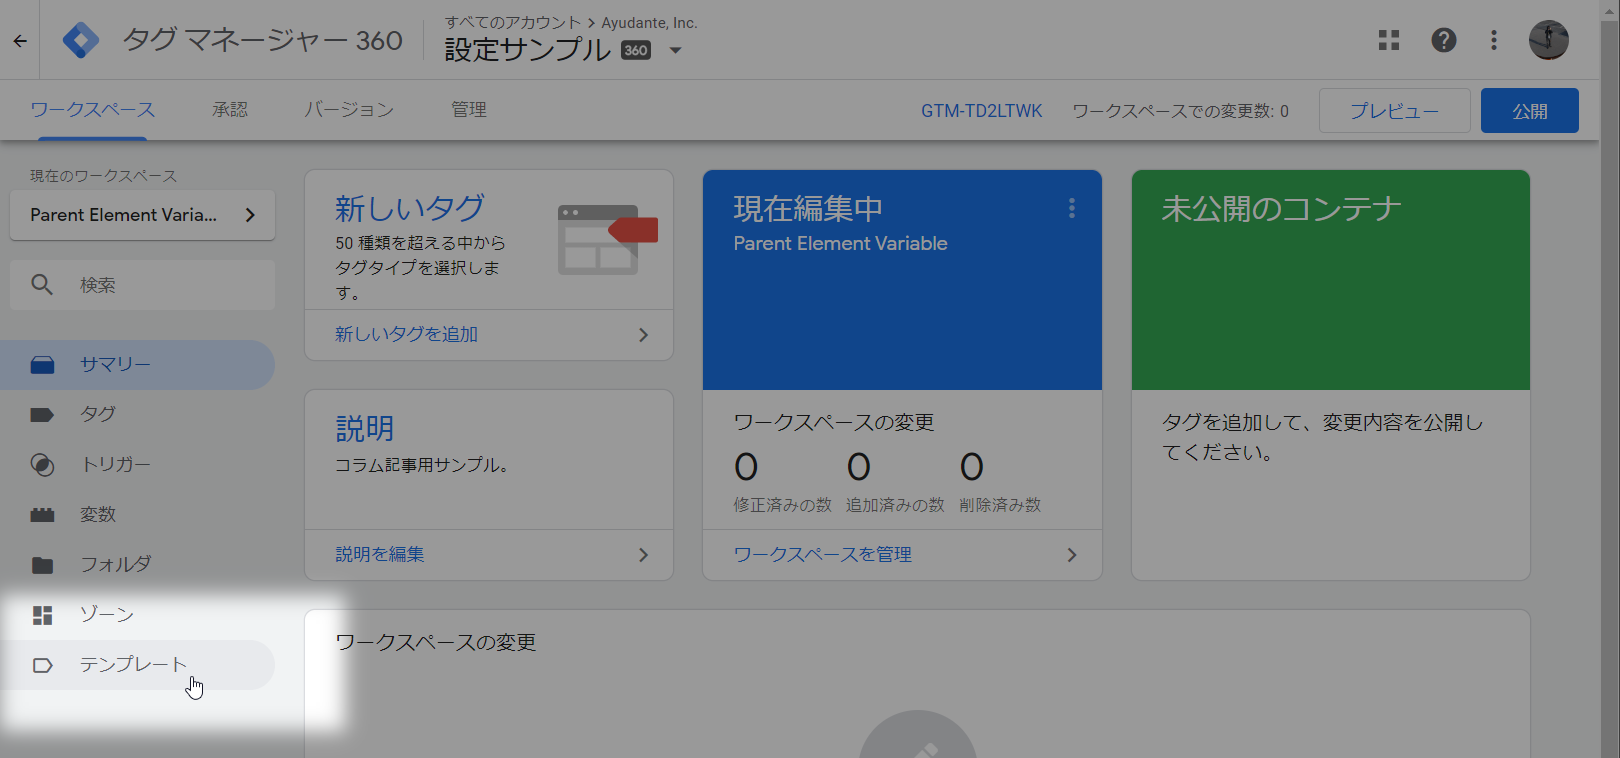
- 「変数テンプレート」ブロックの右上にある「検索ギャラリー」ボタンをクリック
Click the “Search Gallery” button in the upper right corner of the Variable Template block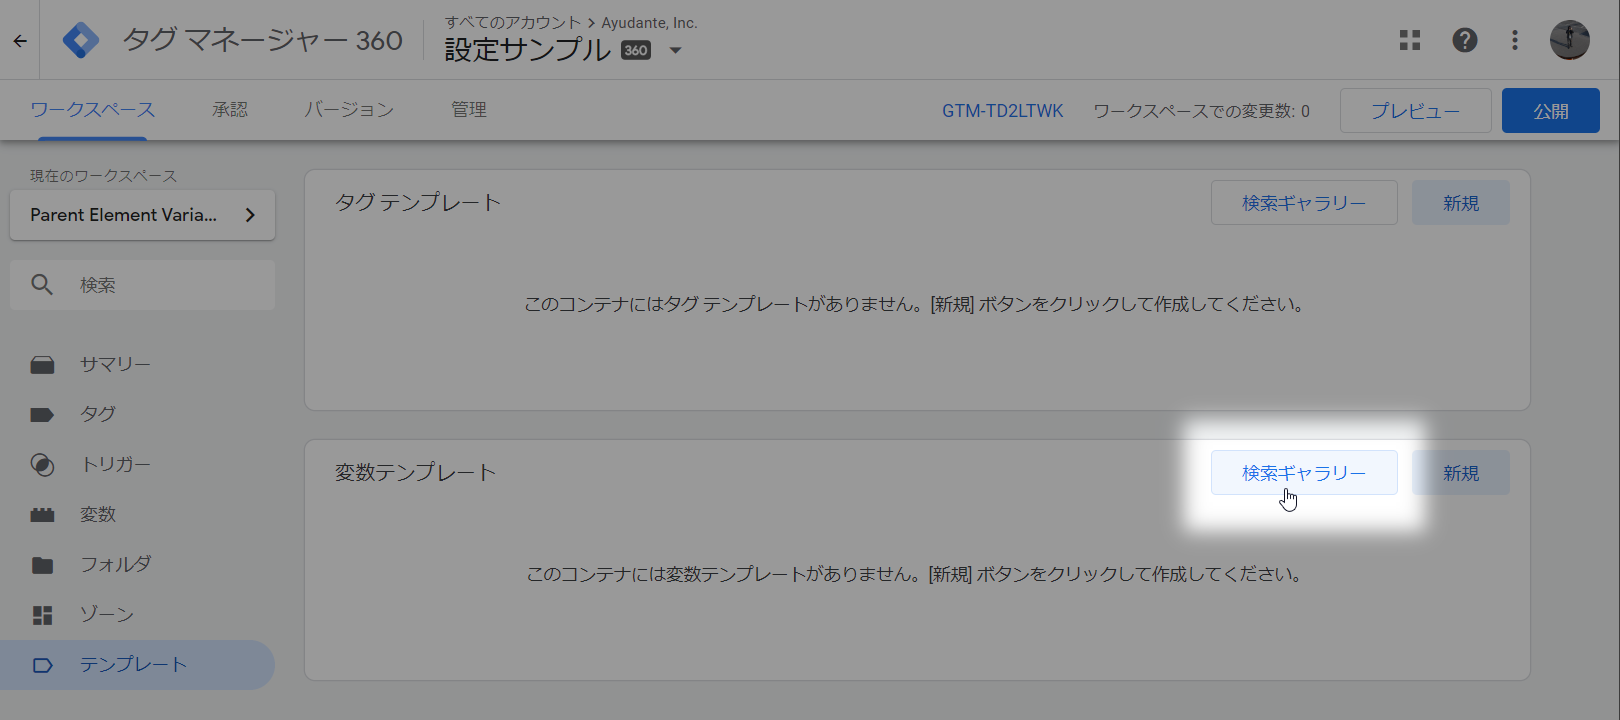
- 「Parent Element Variable」を探し出してクリック
Find and click “Parent Element Variable”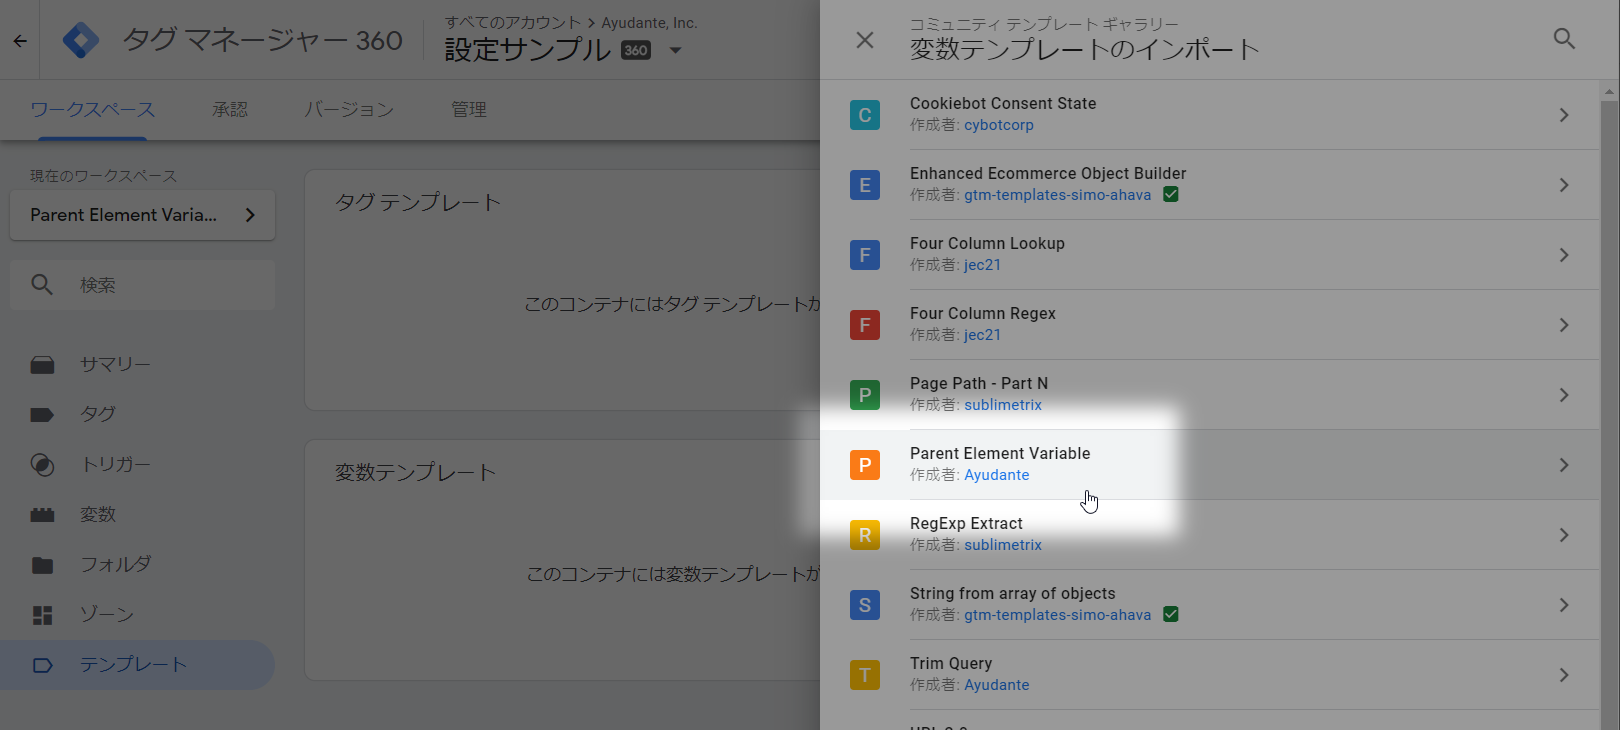
- テンプレートの詳細が表示されるので、右上の「ワークスペースに追加」ボタンをクリック
The details of the template will be displayed, so click the “Add to workspace” button on the top right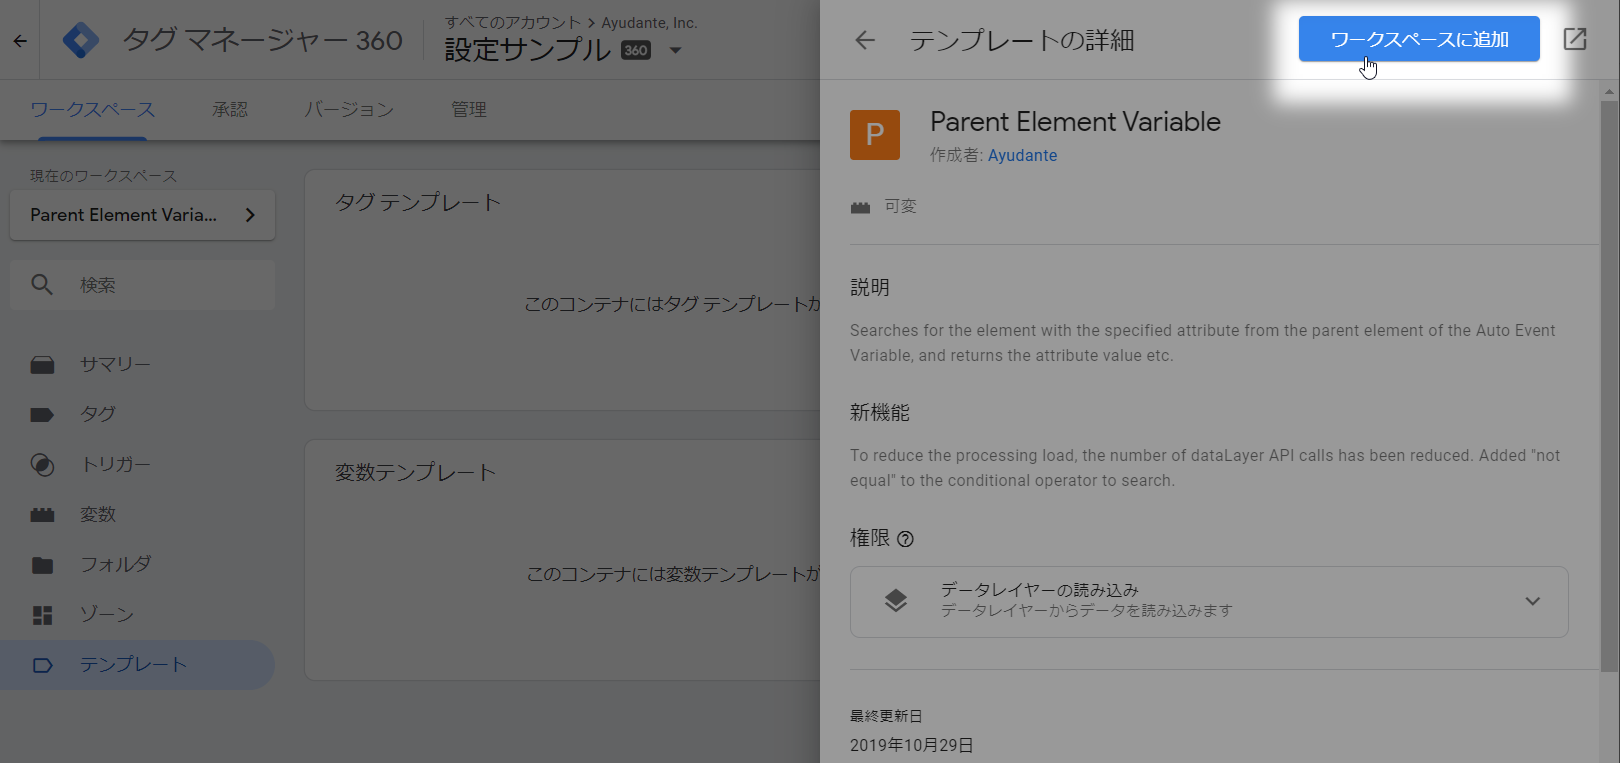
- 確認アラートが出るので、右下の「追加」ボタンをクリック
A confirmation alert will be displayed. Click the “Add” button at the bottom right.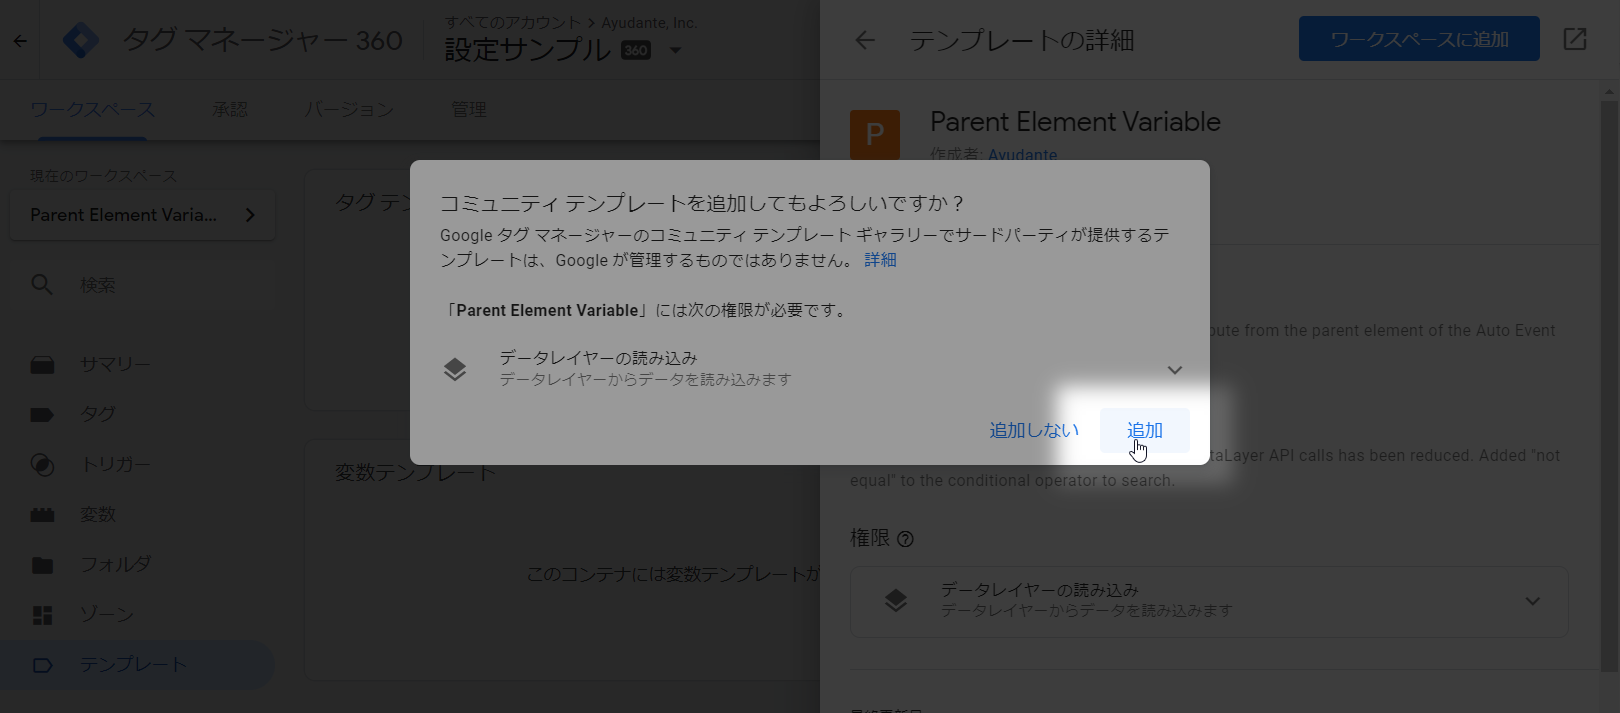
- 完了(バージョン作成すれば他ワークスペースでも利用可能に)
Done (Create a version and use it in other workspaces)
使い方:How to use
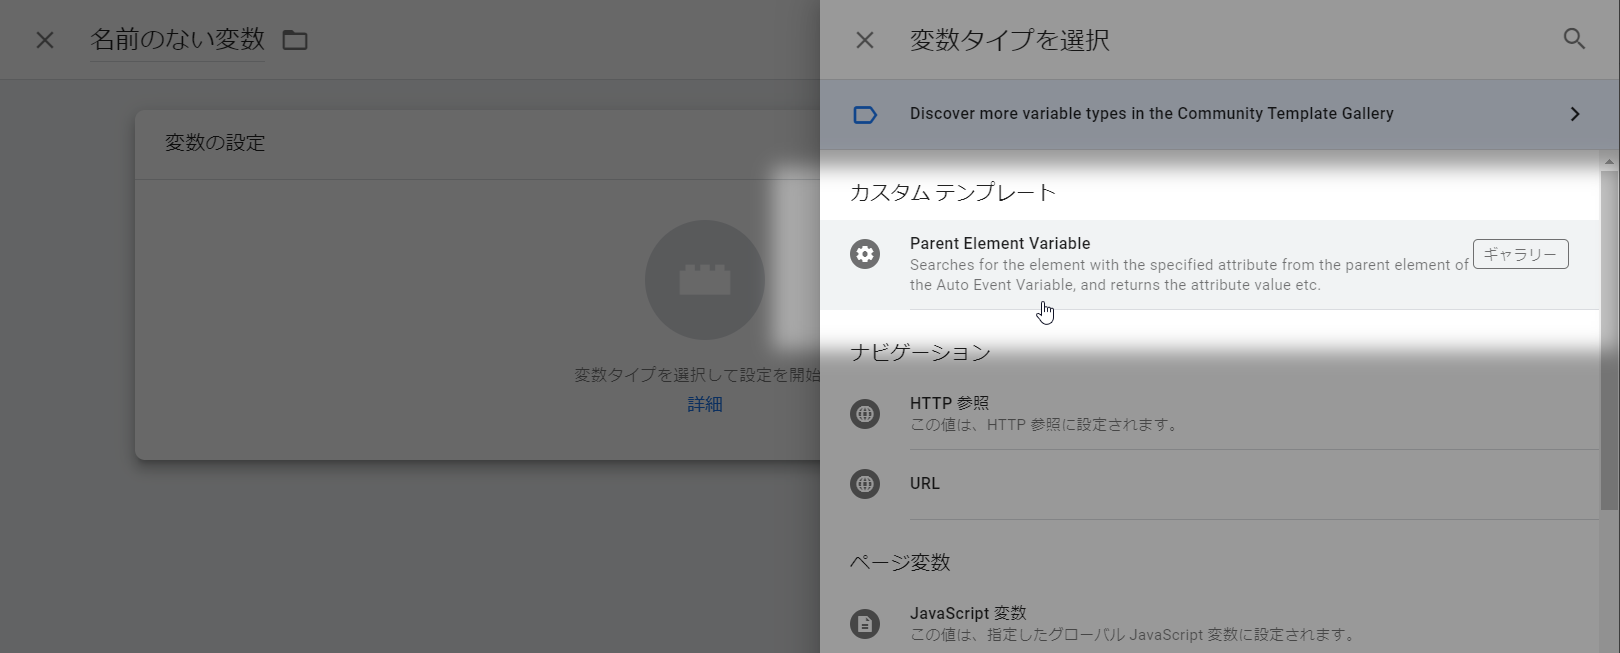
インポートができたら、新規変数登録画面から変数の種類として選択できるようになります。
Once imported, you can select it as a variable type from the new variable registration screen.
それぞれの設定欄は以下のようになっています。
The configuration fields are as follows:
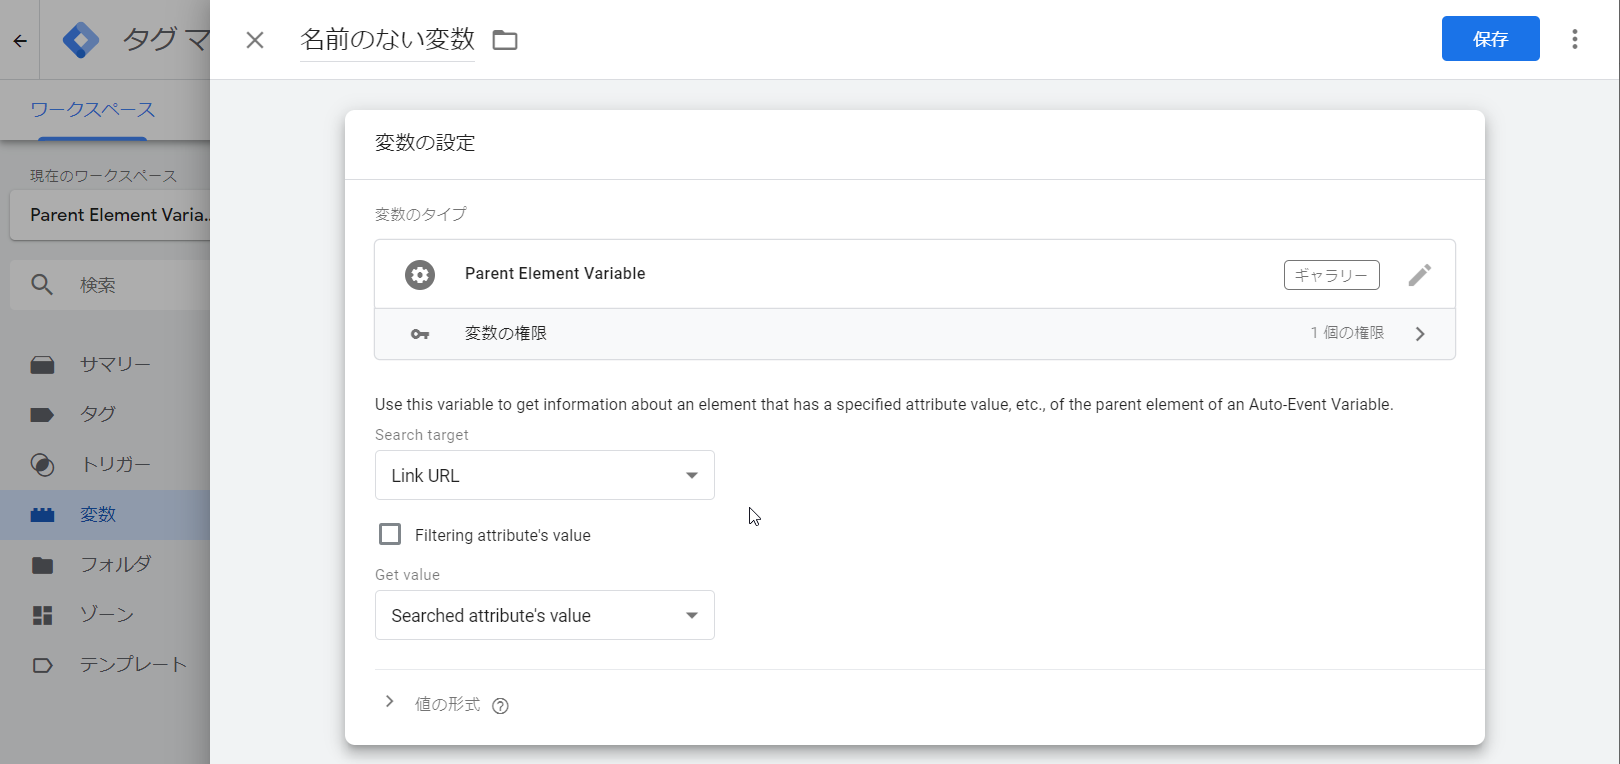
- Search target
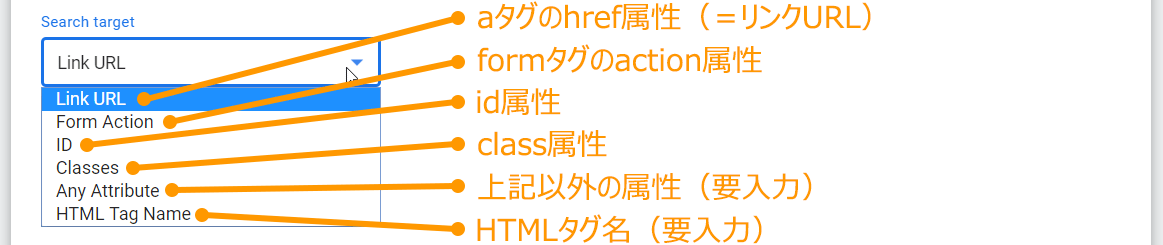
- 探し出したい親要素の条件を指定します。
例えば「Link URL」を選択するとhref属性を持つ親要素が、「ID」を選択するとid属性を持つ親要素が対象となります。
Specify the condition of the parent element to be searched.
For example, if “Link URL” is selected, the parent element with the href attribute is selected, and if “ID” is selected, the parent element with the id attribute is the target. - 「Any Attribute」を選択すると、探したい属性を入力するための「Attribute name」欄が出てきます。
入力した属性を持つ親要素が検索対象となります。
If you select “Any Attribute”, the “Attribute Name” field appears and you can enter the attribute you want to search for. - 「HTML Tag Name」を選択すると、対象としたいHTMLタグ名を入力するための「HTML Tag name」欄が出てきます。
入力したHTMLタグ(例:article など)が検索対象となります。
When “HTML Tag Name” is selected, the “HTML Tag name” field for entering the target HTML tag name is displayed.
- 「Any Attribute」を選択すると、探したい属性を入力するための「Attribute name」欄が出てきます。
- Filtering attribute’s value
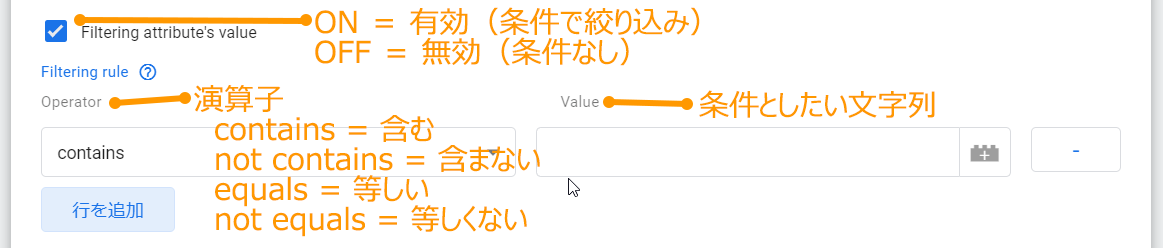
- 「Search target」で指定した属性へ対して、さらに条件を追加したい場合にチェックを入れてください。
例えば「Search target」で「Classes」を選択していて、このオプションで「contains」「example」と設定すると、「example」という文字列をclassに含む親要素が対象となります。
Check this to add more conditions to the attribute specified in Search Target.
For example, if “Class” is selected in “Search target” and this option is set to “contains” and “example”, then the parent element with a class that contains the string “example” is the target. - デフォルトではこのオプションはチェックされていません。
チェックがされていない場合、「Search target」で指定した属性を見つけた場合に「値を問わずに」対象とします。
By default, this option is not checked.
If unchecked, the target is “regardless of value” if the attribute specified in “Search Target” is found. - 「Search target」で「HTML Tag Name」を選択していた場合は、この設定欄は表示されません。
If “HTML Tag Name” was selected in “Search target”, this setting field is not displayed. - 複数の条件を設定した場合、AND条件として扱われます。
If multiple conditions are set, they are treated as AND conditions. - 正規表現は使用できません。
Regular expressions cannot be used.
- デフォルトではこのオプションはチェックされていません。
- Get value

- 探し出した親要素から、どの属性の値を取得するかを設定します。
デフォルトの「Searched attribute’s value」では「Search target」で指定した属性の値が取得されますが、別の属性の値を取得したい場合は「Other attribute’s value」を選び、取得したい属性名を入力してください。
また、「Element Text」を選択すると属性の値ではなく対象要素の内包するテキストを取得できます。
Set the attribute value to get from the found parent element.
The default “Searched attribute’s value” gets the value of the attribute specified in “Search target”, but if you want to get the value of another attribute, select “Other attribute’s value”. Enter the name of the attribute to retrieve.
Select “Element Text” to get the text contained in the target element instead of the attribute value. - 「Element Text」を選択した場合でも、含む画像のalt属性の値は含まれません。
The value of the alt attribute of the included image is not included even if “Element Text” is selected. - 「Element Text」で取得されるテキストでは以下の調整が行われています。
The following adjustments have been made to the text retrieved by “Element Text”:- タブ(インデント)の削除
Delete a tab (indent) - 改行を半角スペースへ置換
Replace line breaks with single-byte spaces
- タブ(インデント)の削除
- 「Search target」で「HTML Tag Name」を選択していた場合は「Searched attribute’s value」は選択できません。
When “HTML Tag Name” is selected in “Search target”, “Search attribute’s value” cannot be selected.
- 「Element Text」を選択した場合でも、含む画像のalt属性の値は含まれません。
以下に具体例を挙げてみますね。
Here is a specific example:
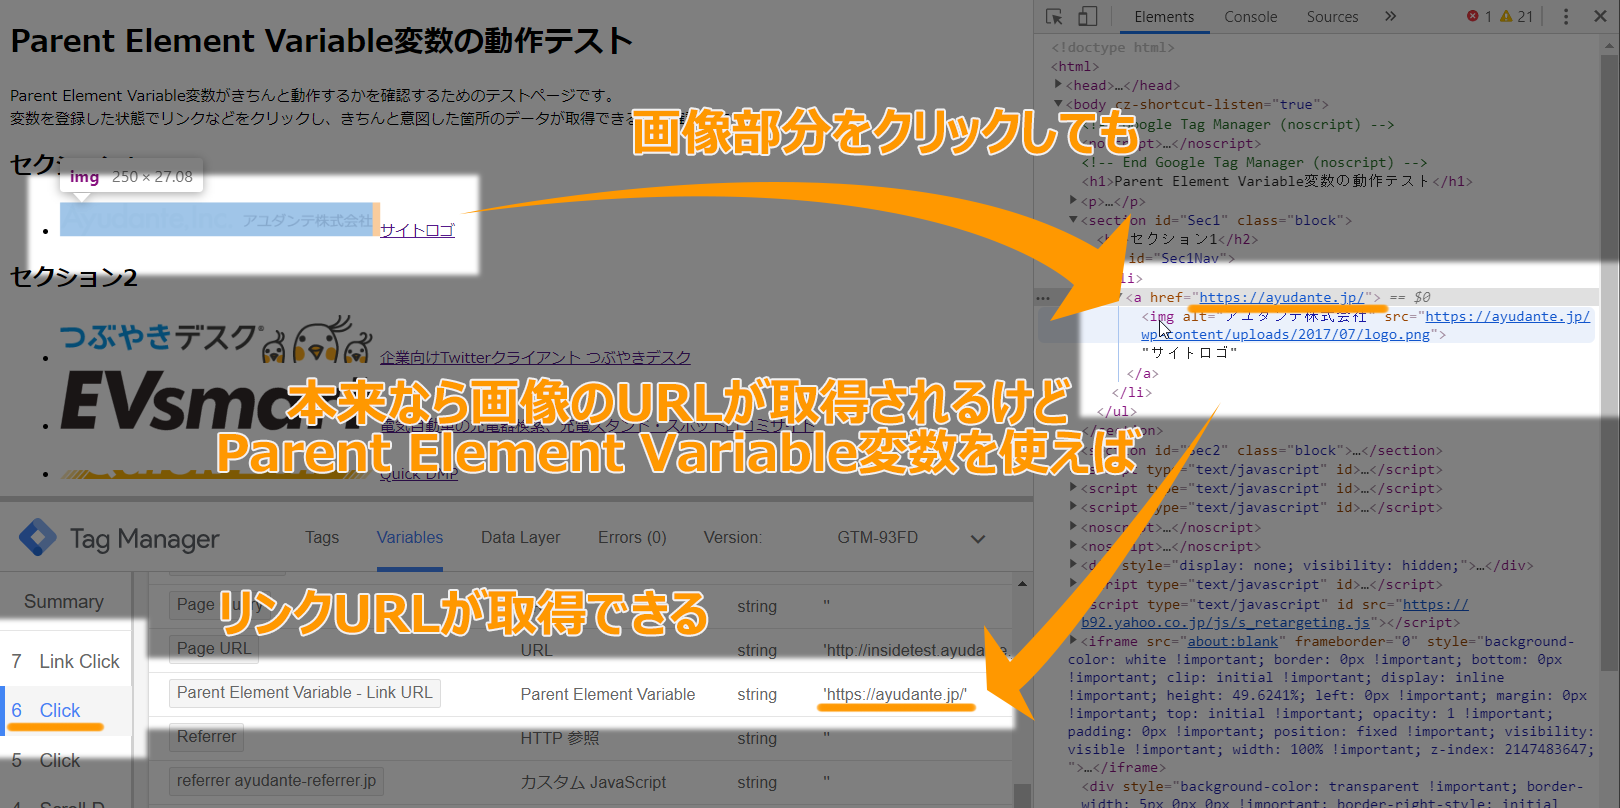
例1)「クリック-すべての要素」トリガーでリンクURLを取得する
Example 1) Get link URL with “Click-All Elements” trigger
リンクを計測したいのに、何かよくわからないけど(おそらくJS処理によって)「クリック-リンクのみ」トリガーが反応しない、というケースに遭遇したことのある方も多いと思います。
その場合、仕方がないので「クリック-すべての要素」トリガーで代替する必要が出てきますが、「クリック-すべての要素」トリガーではClick URL変数は必ずしも「リンクURL(href)を取得する」とは限りません。
Many people encounter when the “Click-Just Links” trigger does not respond to link measurements.
In that case, you have no choice but to replace it with a “Click-All Elements” trigger. However, in the “Click-All Elements” trigger, the click URL variable does not necessarily retrieve “link URL (href)“.

そういった「クリック-すべての要素」トリガーで代替するような場合は、以下の設定にするとリンク内のどこをクリックしてもリンクURL(aタグのhref属性)が取得できる変数となります。
If you want to replace this with a “Click-All Elements” trigger, you can set the following as a variable that can get the link URL(tag’s href attribute) each time the link is clicked.
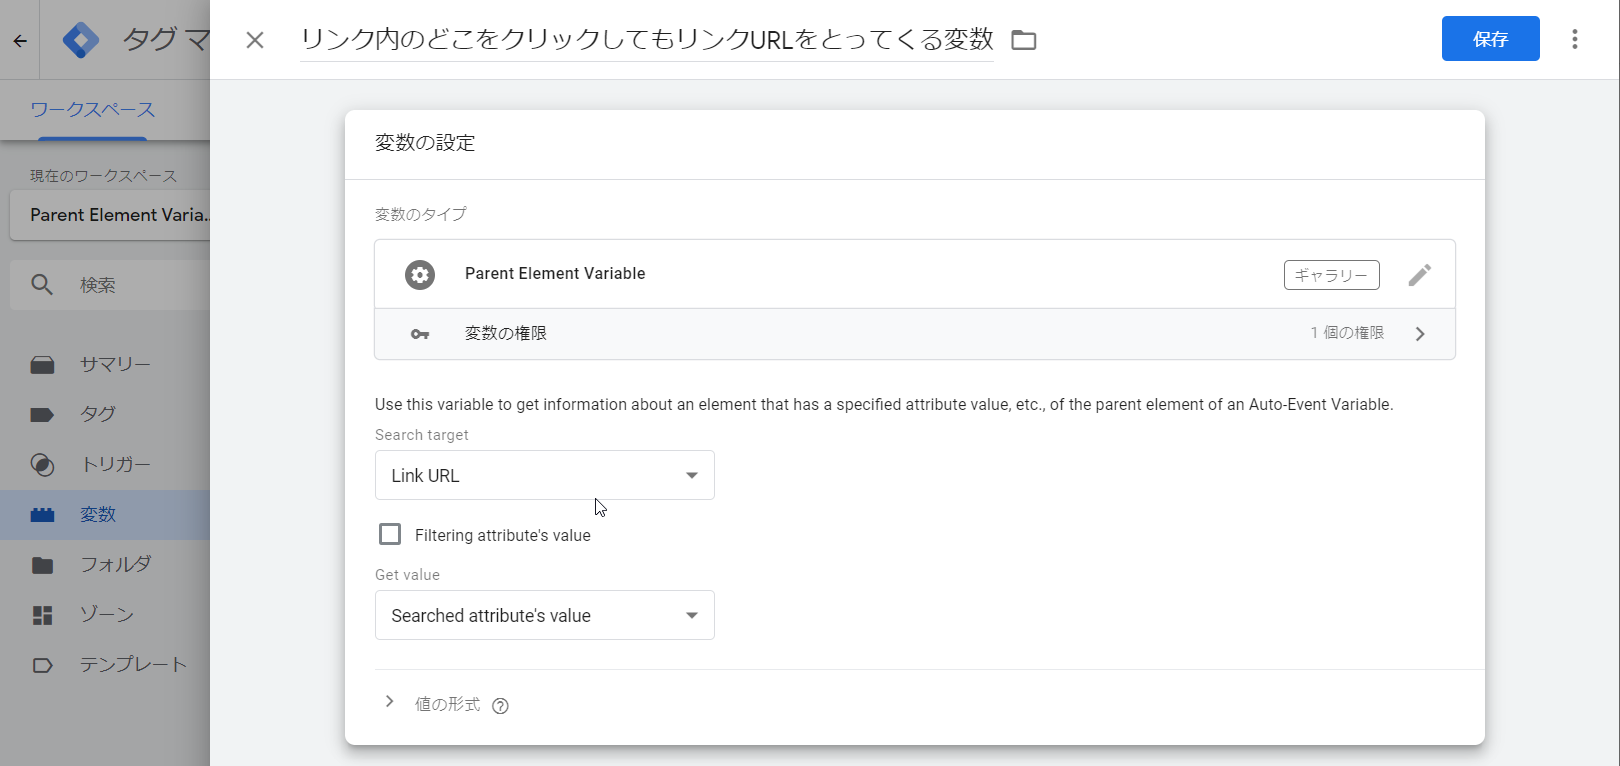
- Search target
- Link URL(デフォルト値)
- Filtering attribute’s value
- OFF(デフォルト値)
- Get value
- Searched attribute’s value(デフォルト値)
例2)親要素のIDを取得する
Example 2) Get parent element ID
トリガーの設定では「CSSセレクタに一致する」という演算子を使うことで、親要素のID(やclassなど)を指定することができます。
ただ、そういったトリガーで呼び出されたタグ内から、その親要素のID(やclassなど)を取得して利用したい、といった場合は困難です。特に複数の要素を対象とする条件のトリガーであれば「設定条件のどれに合致したか」を知りたい時もありますよね。
In the trigger settings, you can specify the ID (or class, etc.) of the parent element using the operator “matches CSS selector”.
However, it is difficult to obtain and use the ID (or class etc.) of the parent element from within the tag called by such a trigger.In particular, if you want to trigger a condition that targets multiple elements, you may want to know which set condition is met.
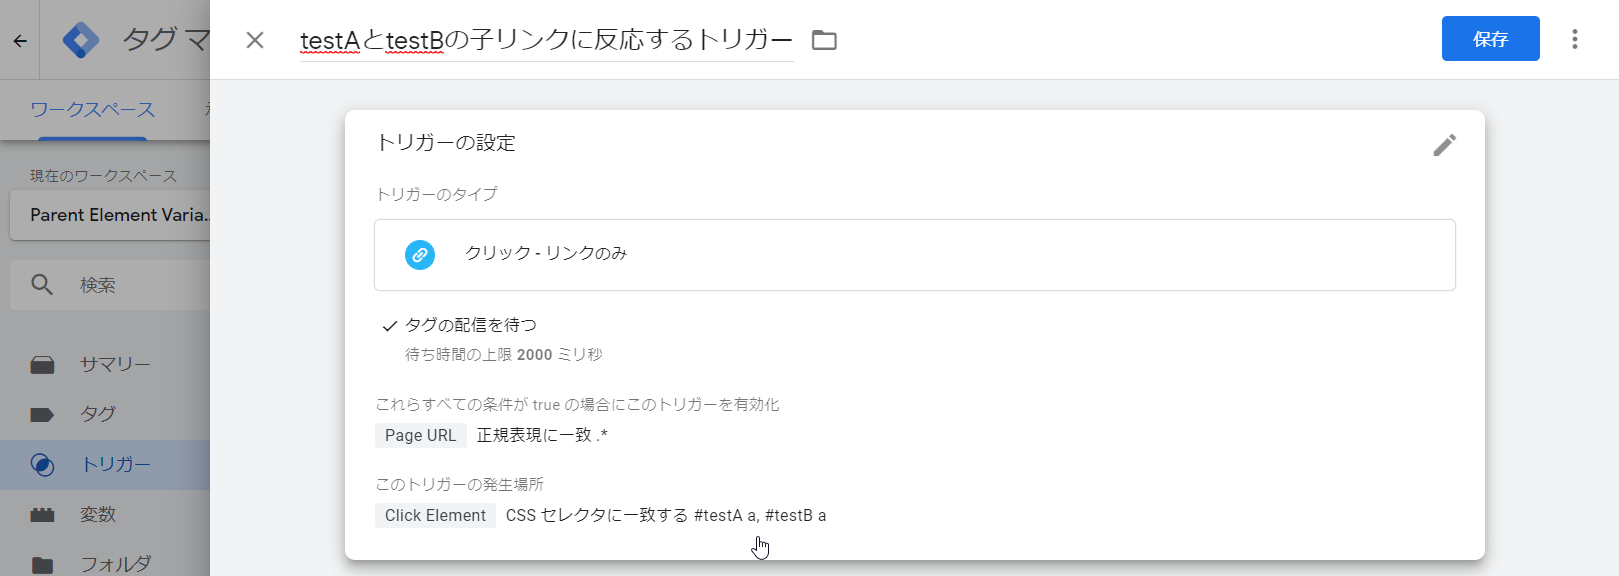
以下のような設定にすると「クリックされた要素から直近のID」を取得する変数になります。
If it is set as follows, it will be a variable to get “ID close to the clicked element”.
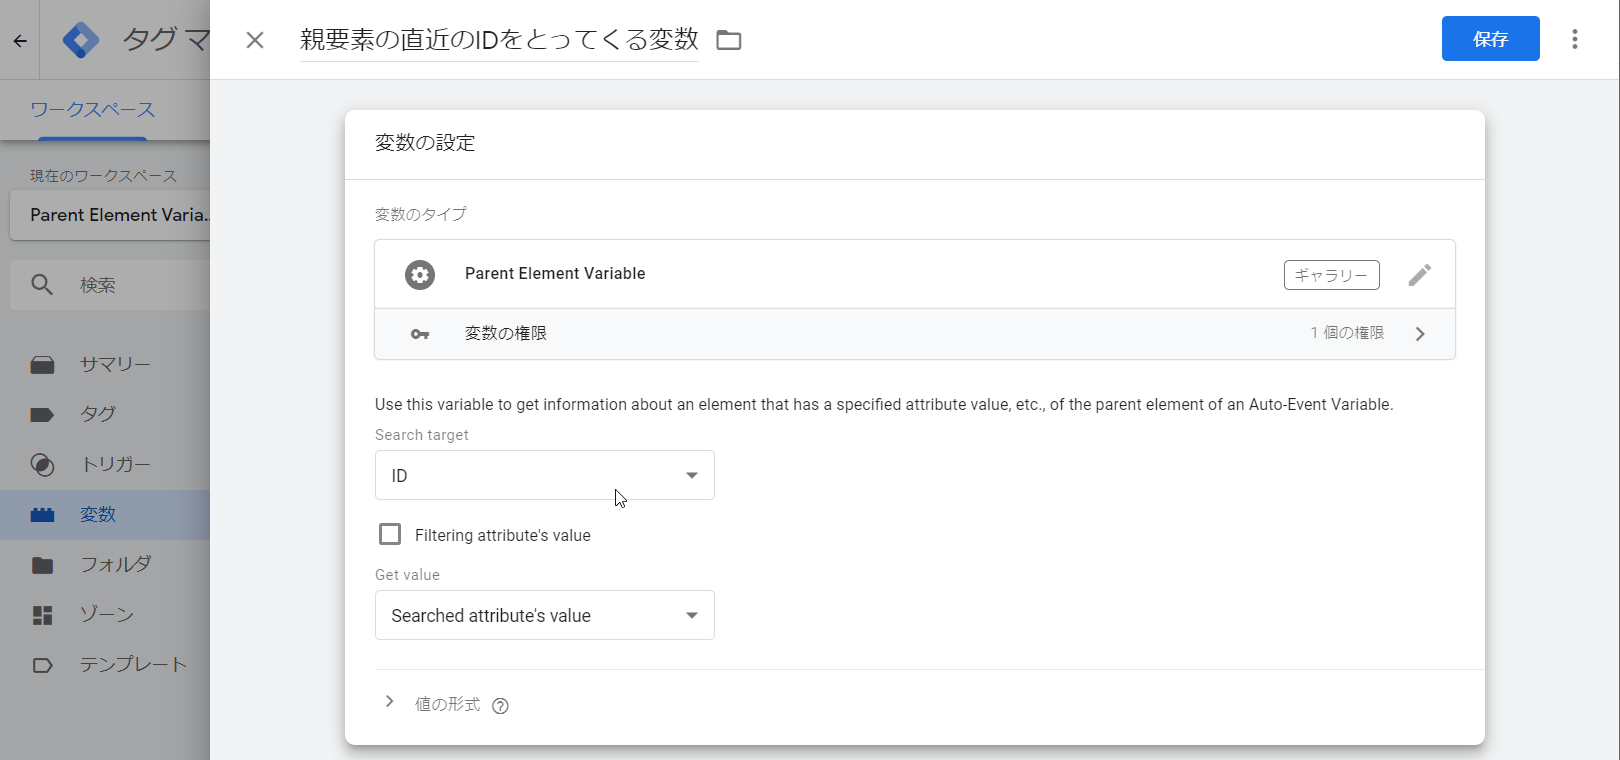
- Search target
- ID
- Filtering attribute’s value
- OFF(デフォルト値)
- Get value
- Searched attribute’s value(デフォルト値)
ただ、上記の設定だと取得できるのはあくまで「直近の」IDとなります。
そのため、トリガーの条件に指定した親要素へ至る前に、別のIDを持っている要素がある場合は取得したい親要素のIDが取得できません。
However, with the above settings, only the “closest” ID can be obtained.
Therefore, if there is an element with another ID before reaching the parent element specified in the trigger condition, the ID of the expected parent element cannot be obtained.
そのような場合は、次の例のように「Filtering attribute’s value」で条件を指定することで取得できるかもしれません。
In such a case, it can be obtained by specifying a condition in “Filtering attribute’s value” as shown in the following example.
例3)〇〇というclassを持つ親要素のIDを取得する
Example 3) Get a ID of a parent element with a class of OO
例えば次のようなHTML構造になっていると、「Search target」を「ID」にしても、Sec1やSec2のIDは取得できません。
For example, in the following HTML structure, even if “Search target” is set to “ID”, the IDs of Sec1 and Sec2 cannot be obtained.
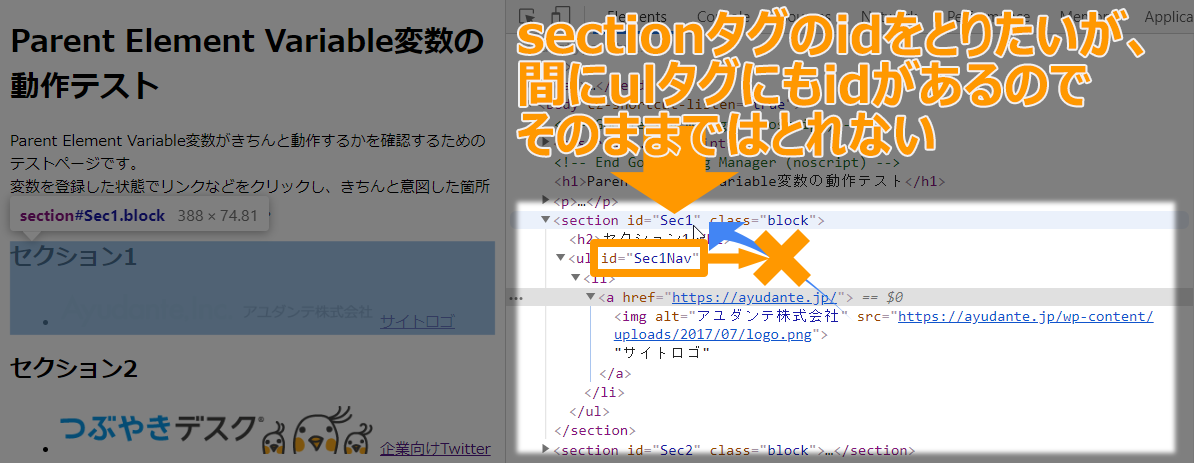
この場合、よく見てみるとIDを取得したい親要素は共通して「block」というclassを持っているようです。
それであれば「Filtering attribute’s value」で条件へ組み込むことで、「block」というclassを持つ親要素のIDを取得する変数が作れます。
In this case, if you look closely, it seems that there is a class called “block” in the parent element that gets the ID in common.
In that case, you can create a variable that gets the ID of the parent element with the class “block” by including it in the condition using “Filtering attribute’s value”.
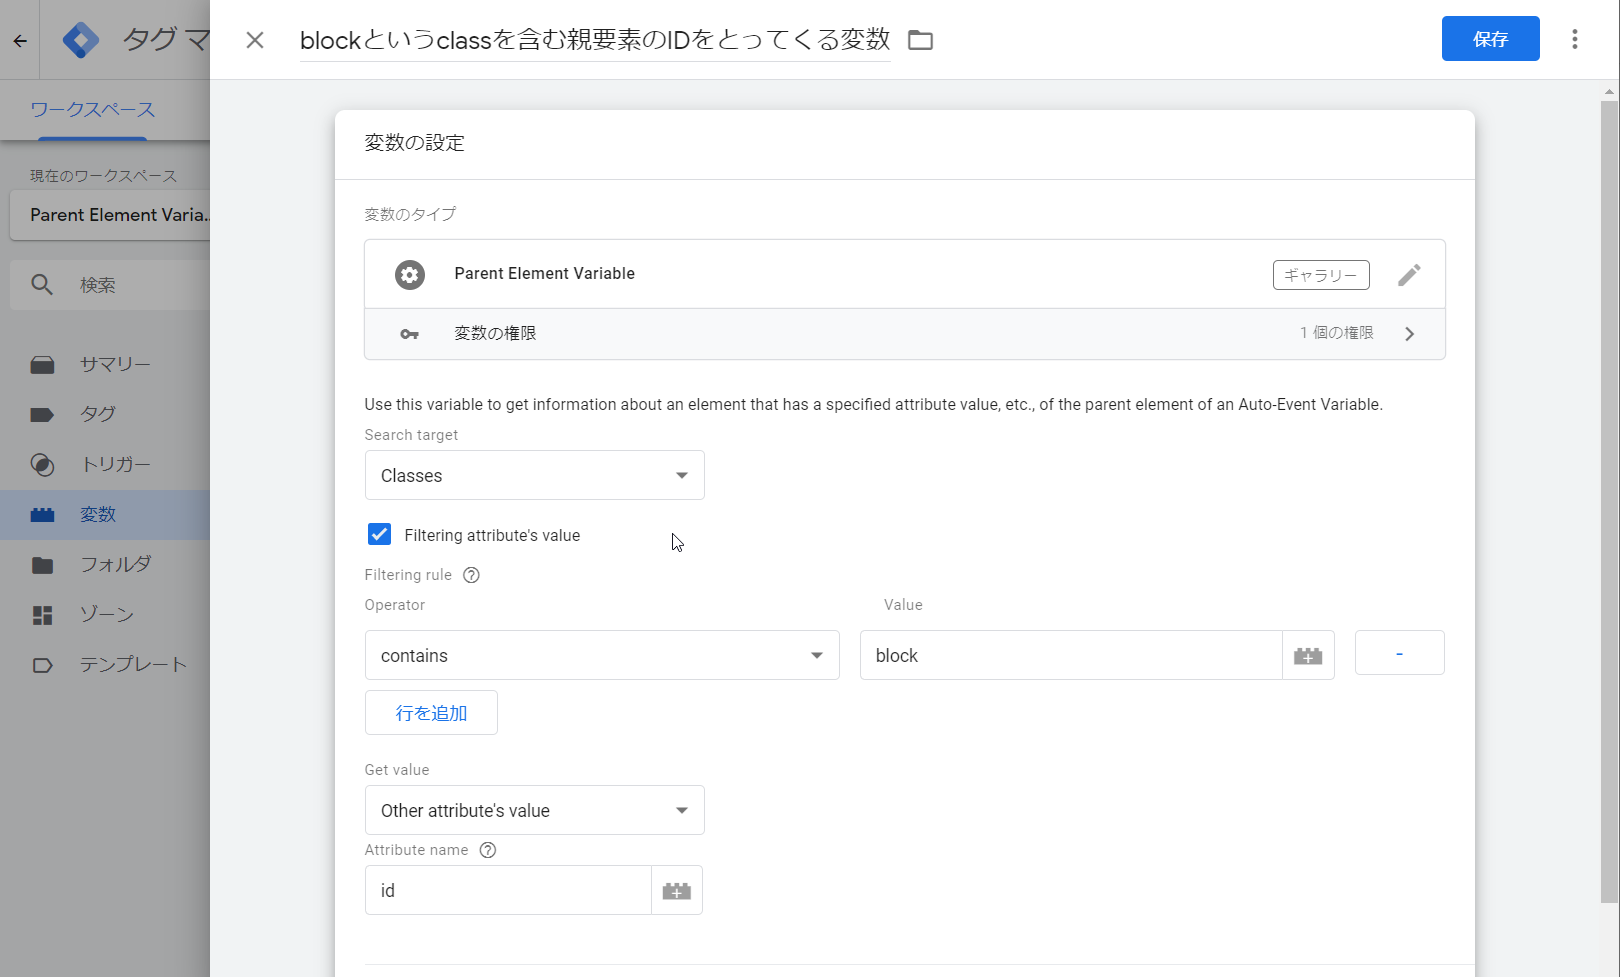
- Search target
- Classes
- Filtering attribute’s value
- On
- [contains] [block]
- Get value
- Other attribute’s value
- Attribute’s name:id
「『block』というclassを持つ親要素」を「Search target」と「Filtering attribute’s value」で指定し、実際に取得したいIDは「Get value」で指定する、という形です。
このように、「探し出したい要素の情報」と「取得したい情報」を切り分けることでちょっと複雑な場合も対応できます。
“Parent element with class ‘Block'” is specified by “Search target” and “Filtering attribute’s value”, and the ID that is actually acquired is specified by “Get value”.
In this way, by separating “information of elements to be searched” and “information to be acquired”, it is possible to handle somewhat complicated cases.
いかがでしたでしょうか。
おそらく地味に役立つはずですので、オススメできるテンプレートになっていると思います。
特に(例1)のような場面を経験される方も多いかと思いますので、とりあえずすべてデフォルト値の変数を用意しておくだけでだいぶ楽になるのではないかな、と。
Probably useful, I think it is a recommended template.
In particular, I think that there are many people who experience the situation like (Example 1), so I think it is much easier to prepare all default value variables for the time being.
そしてありがとうGoogle翻訳。
Thanks for Google Translate.