デジタルマーケティングエンジニア 春山 勇悟のコラム「Googleタグマネージャ基礎 初心者でもわかるデータレイヤー」をデジタルマーケティングエンジニア JAIN Vibhor が英訳したものになります。
While working with Google Tag Manager (GTM), the dataLayer is the most important concept to understand and utilize the wide range of data.
This article aims to explain the dataLayer in as simple terms as possible. Understanding the mechanism can be challenging, but I hope this article will broaden your implementation options!
What is a dataLayer?
First, let’s explain what a dataLayer is. The dataLayer is like a temporary storage box that sits between your page and GTM, storing data. (Tehnically, it is javascript object, but with minor modifications)
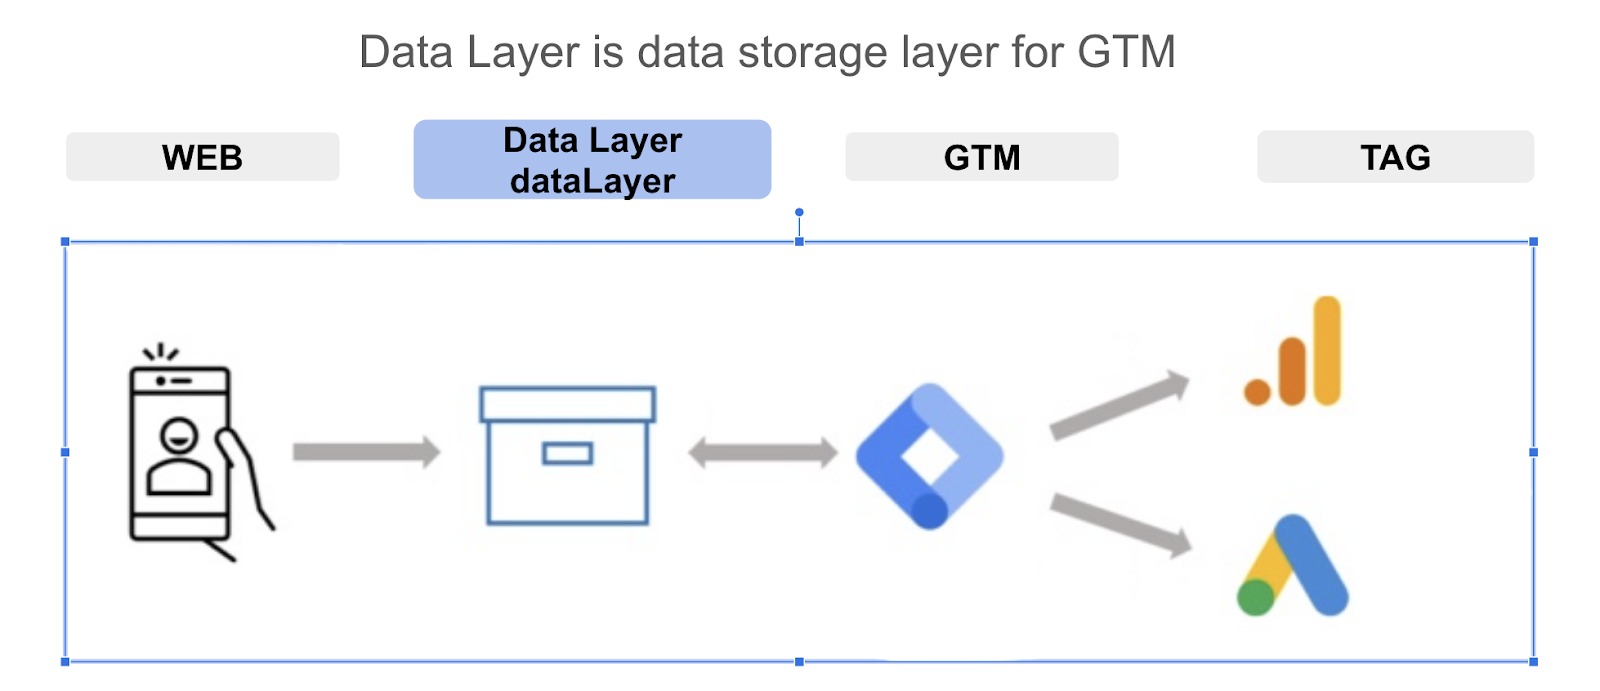
This box fills up with various data, such as the page’s URL and information about clicked elements. GTM uses the data in this box for tags, triggers, and variables. Moreover, GTM only uses the data stored in this dataLayer.
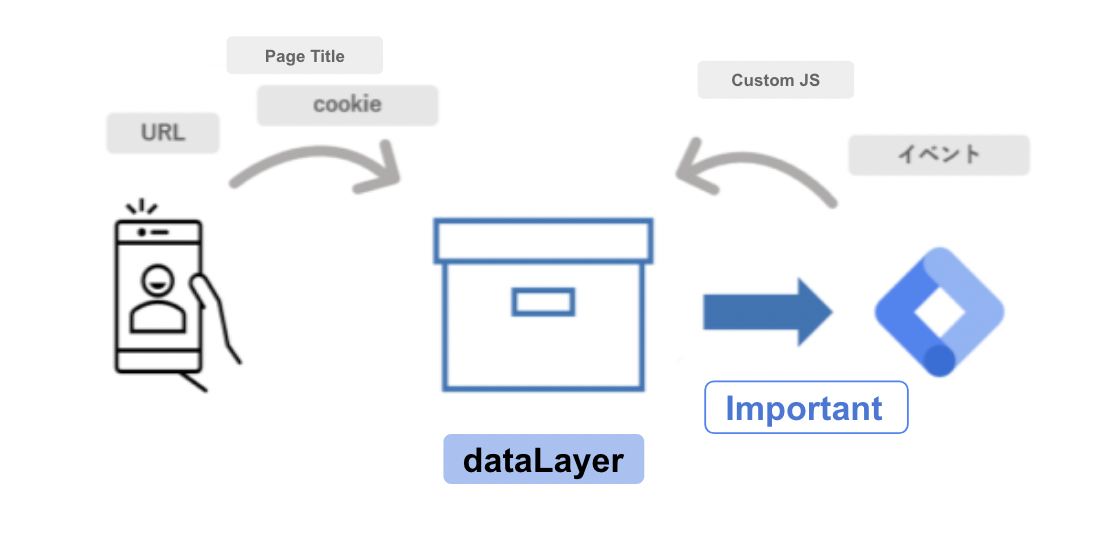
In fact, when the GTM container tag is loaded on a page, it automatically creates a dataLayer, and most of the data on the page is added automatically to this newly created dataLayer
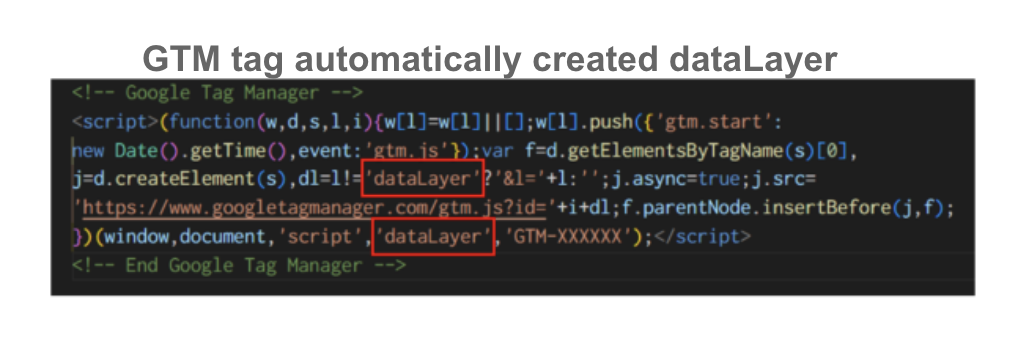
Because of this, we can handle various data without consciously thinking about the dataLayer.
Those who have followed along so far might think, “If it’s handled automatically, do I really need to learn about it?”
However, there is data that the dataLayer cannot automatically acquire.
What kind of data would that be?
And how can we acquire such data?
I will explain that method later on.
Benefits of Using the dataLayer
Earlier, I explained that data within a page is automatically added to the dataLayer. However, what kind of data would need to be added custom?
It refers to “data not contained within the page.“
Naturally, data that does not exist on the page cannot be added to the dataLayer. Specifically, this could include:

By utilizing the dataLayer, it’s possible to measure data that is not contained within the page.
dataLayer Implementation Patterns
Since the dataLayer is a JavaScript object, implementing it requires modifications to HTML. There are mainly three methods for implementing the dataLayer:
- Asking a developer
- Using a plugin (such as for WordPress)
- Using the browser’s console (reflected only in your own browser, for verification purposes)
In this article, we will explain the method of “asking a developer.”
dataLayer Implementation Method (Asking a developer)
The process of implementing a dataLayer can be broadly divided into two steps.
STEP1: Create the dataLayer
STEP2: Add data to the dataLayer
Let’s start with STEP1.
STEP1: Create the dataLayer
First, you create the dataLayer. The code looks like this:
| <script> dataLayer = []; </script> |
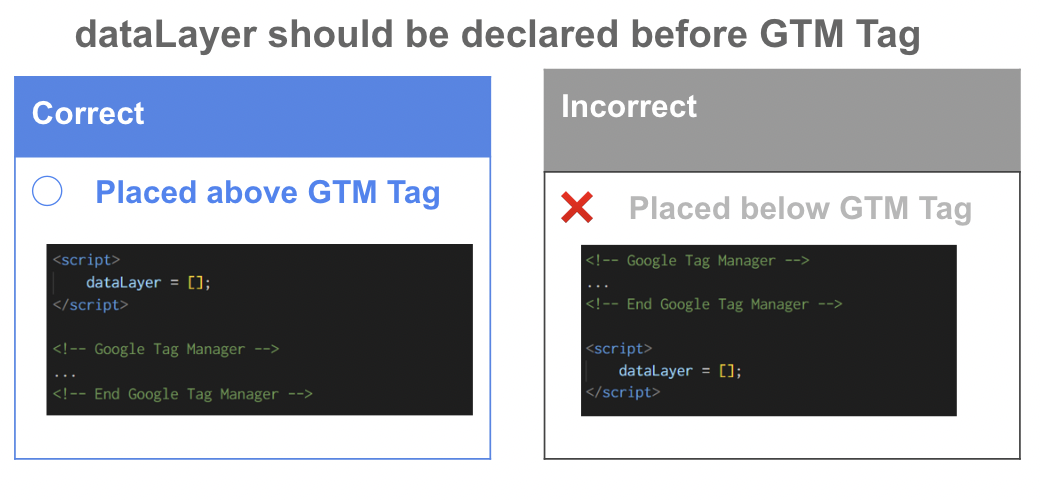
What’s important here is the placement of the dataLayer code.
Always add it above the GTM container tag!
The reason is that you can only create only one “box” for the dataLayer. As mentioned earlier, when the GTM container tag is loaded, it automatically creates a dataLayer. Therefore, if you try to create a new dataLayer below the GTM container tag, it will result in an error because the box already exists.
You might think, “Then wouldn’t adding the code above result in two dataLayers, causing an error?”
However, in reality, if there is already a dataLayer present, the GTM container tag will continue to use that existing “box” and add data to it. Therefore, creating a dataLayer above the GTM container tag does not cause an error.
STEP2: Adding Data to the Created dataLayer
There are two ways to add data to the created dataLayer:
- Using “=” to assign data
- Using the “push” command to add data
The code for each method is as follows:
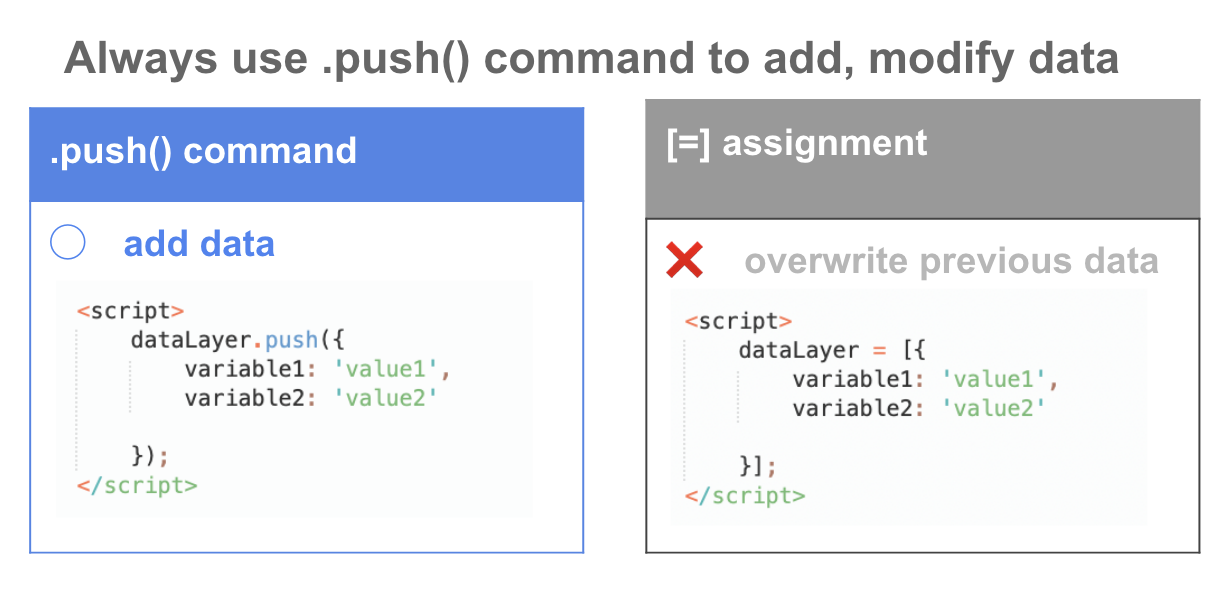
■ Using “=” to assign data
| <script> dataLayer = [{ variable1: ‘value1’, variable2: ‘value2’ }]; </script> |
■ Using the “push” command to add data
| <script> dataLayer.push({ variable1: ‘value1’, variable2: ‘value2’ }); </script> |
Next, let’s explain the differences between these two methods.
Using “=” to assign data
“This method is very dangerous, and therefore not recommended!”
The reason being, using “=” to assign data completely overwrites the contents of the dataLayer, which could cause functionalities to stop working.
Since the dataLayer accumulates various data, overwriting its contents can cause GTM to stop functioning. Therefore, please do not use this method.
Using the “push” command to add data
This implementation differs from the earlier mentioned use of “=”, as it simply adds data instead of completely overwriting it. Therefore, there is no need to worry about complete overwrites.
As a point of caution, it’s necessary that the dataLayer has been created beforehand.
The push command is a method for adding data to the dataLayer, so if the dataLayer itself does not exist, it will result in an error.
Summarizing the two implementation methods, it can be illustrated as follows.
Optimal dataLayer Implementation Method
While we’ve discussed two methods of adding data to the dataLayer, there are issues to consider:
- Using “=” carries the risk of overwriting data.
- Using “push” requires careful consideration of where to add the code.
However, there is an implementation method that solves these problems.
The code would look as follows:
| <script> window.dataLayer = window.dataLayer || []; dataLayer.push({ variableName: “value”, }); </script> |
This part is the most important point in this code.
| window.dataLayer = window.dataLayer || []; |
The process is very simple.
- If a dataLayer variable exists, it continues with the contents of that box.
- If there is no variable, it creates a new one.
By adding this code before the push command, it eliminates the need to check whether the variable exists or not, which was a weak point!
Therefore, always use this implementation method when working with the dataLayer.
How to Use the dataLayer
The dataLayer has two main functions:
- Adding data (dataLayer variables)
- Notification of data addition (Custom events)
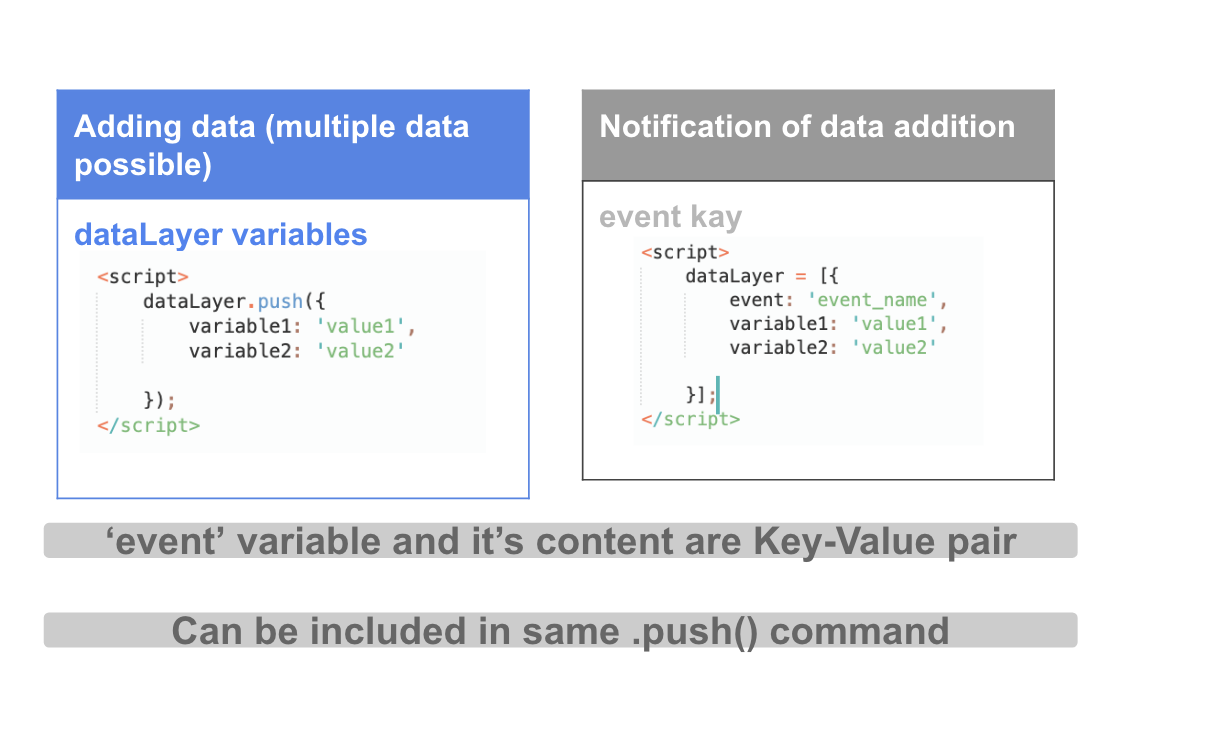
Let’s start by looking at how to use dataLayer variables.
How to use dataLayer variables
In the dataLayer, you add a key-value tuple (pair).
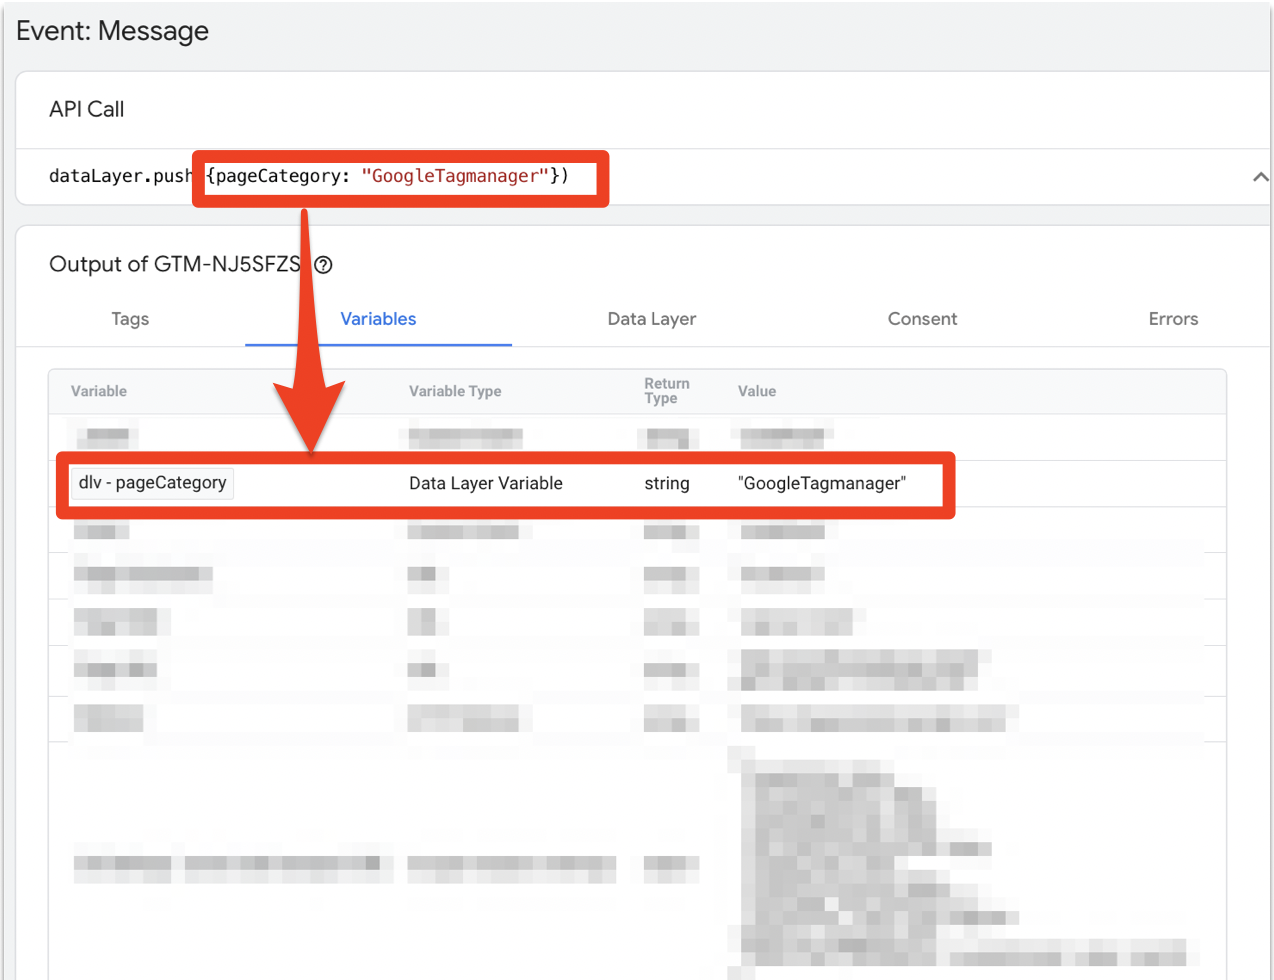
For example, if you are adding page category information as a variable, the code would look like this:
【Variable Name】pageCategory 【Value】GoogleTagManager
| <script> window.dataLayer = window.dataLayer || []; dataLayer.push({ pageCategory: “GoogleTagmanager”, }); </script> |
When you check in GTM’s preview mode, you can see that the data has been added. However, at this point, GTM still does not know how to process this data. Therefore, it is necessary to create corresponding variable (i.e., dataLayer variable) to store the added data.
To store the value of the previously mentioned variable name “pageCategory”, the setup is as follows:
■ How to Set Up
Please create a new one from GTM > User-Defined Variables > dataLayer Variable.
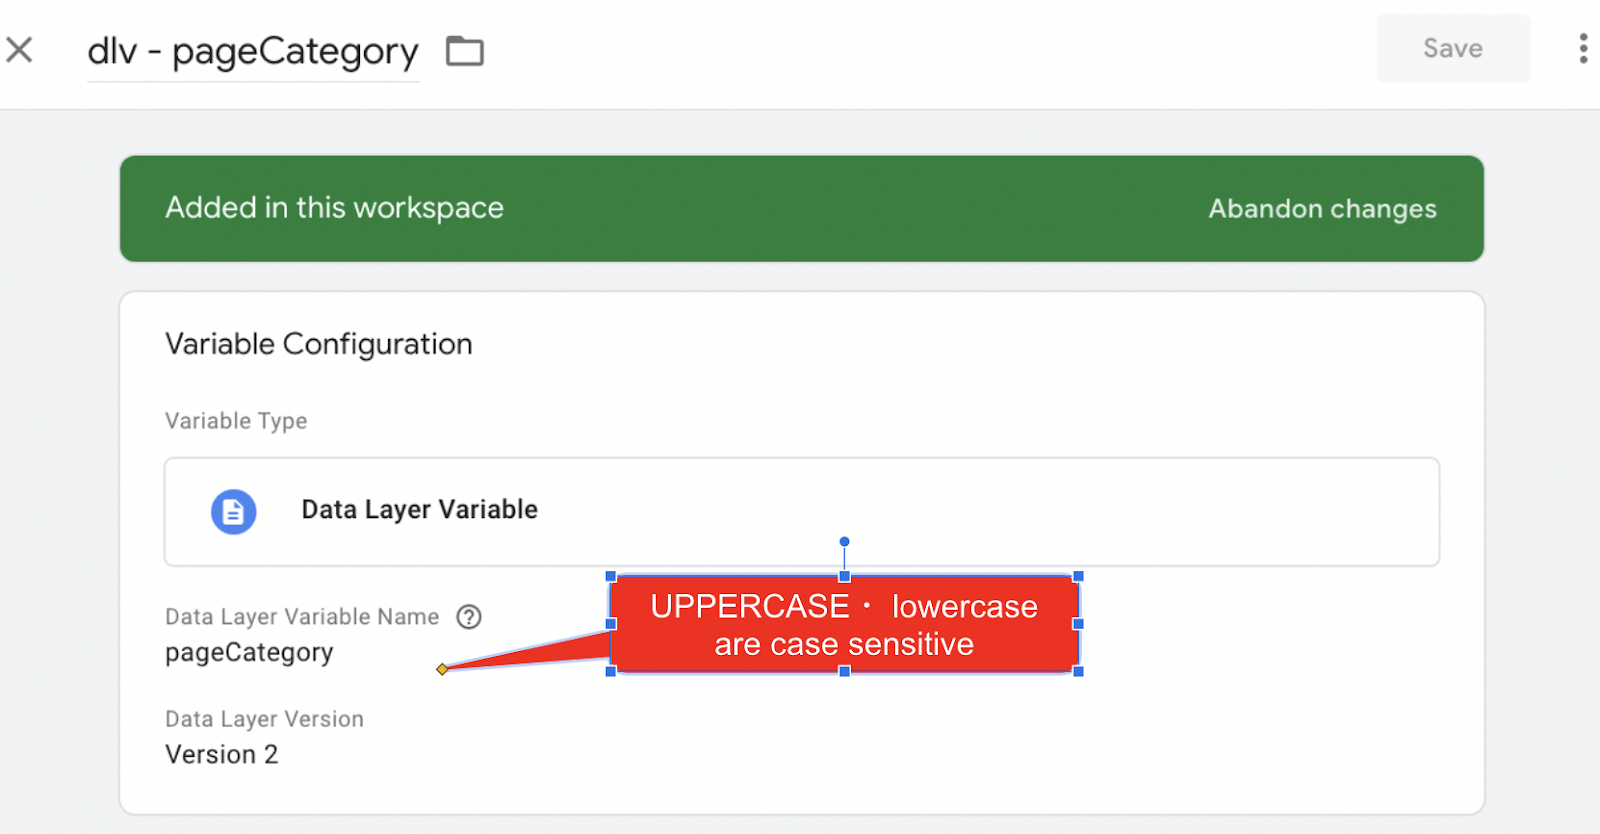
By creating a dataLayer variable, the values will be properly stored in the variable.
How to use custom event triggers
Next, let us see how to use a custom event trigger with the “Notify Data Addition” feature.
For example, consider when you want to notify that the following dataLayer has been added at the time a user logs in.
[Event Name] login
| <script> window.dataLayer = window.dataLayer || []; dataLayer.push({ event: “login”, }); </script> |
What’s important here is that the place where you previously entered the variable name now contains the key “event”. Unlike variables, this is a fixed value, and you cannot have more than two events in a single dataLayer.
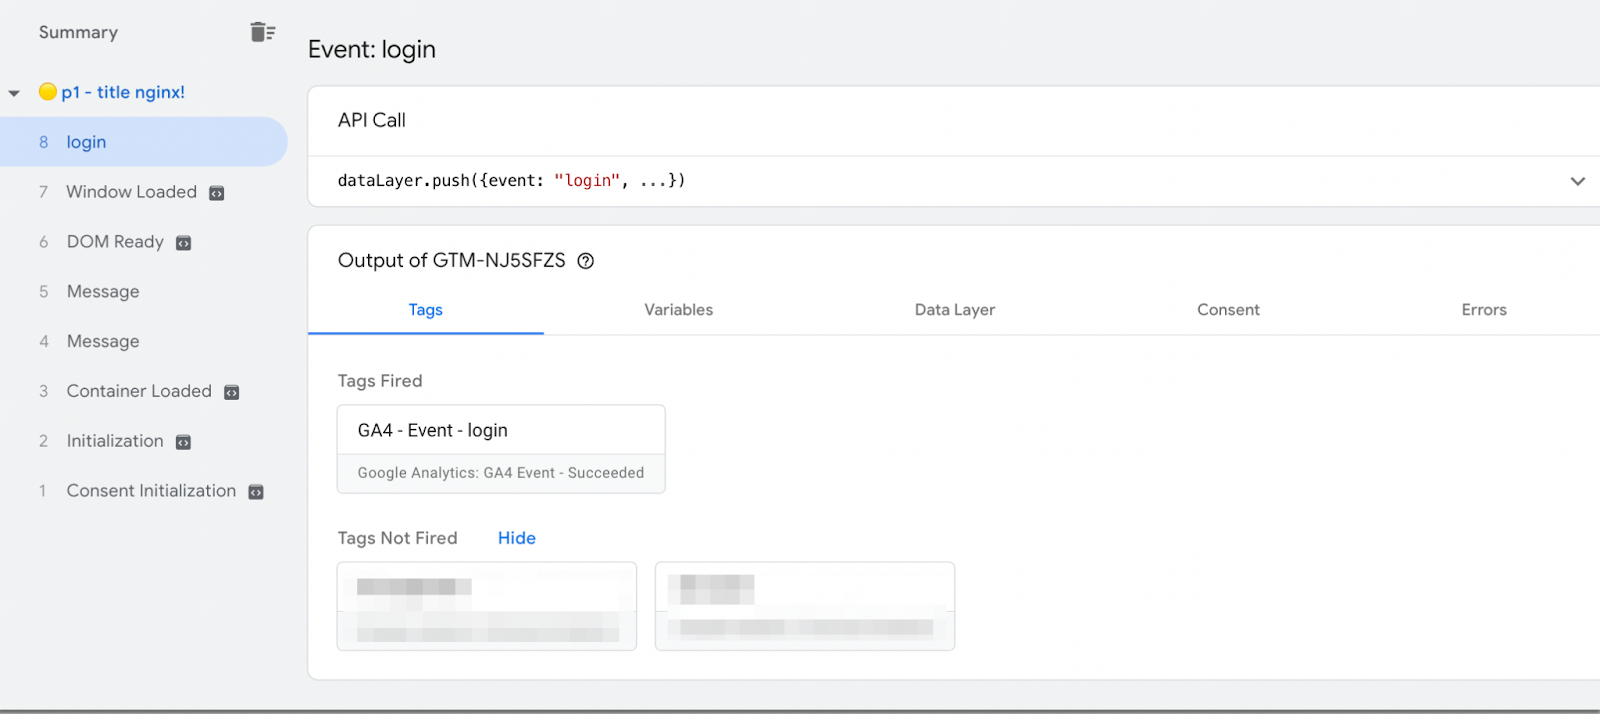
By entering the event name (in the above example, “login”) as the value of the event, you can notify GTM of the timing at which data has been added.
You can use this event as a trigger condition.
■ How to Set Up
Please create a new one from GTM > Triggers > Custom Event.
Enter the event name you added in the dataLayer in the event name field.
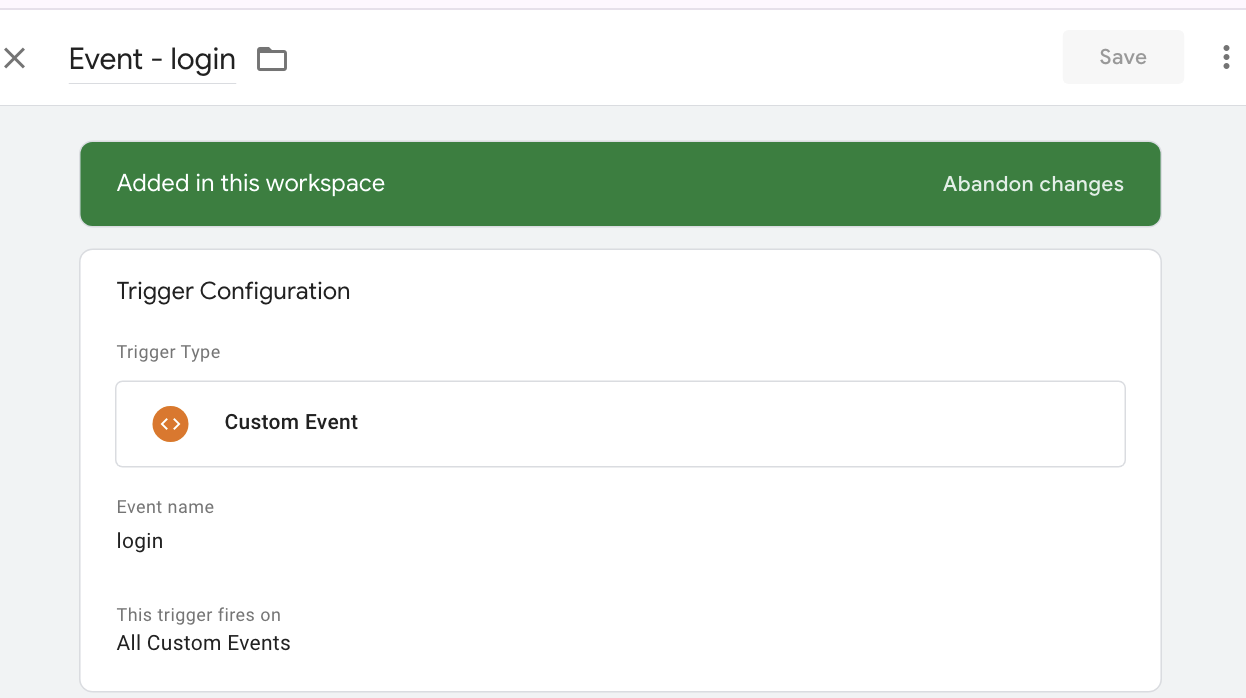
With this, you will be able to fire (measure) tags at the timing when data is added.
Ways to Utilize the dataLayer
There are many patterns for utilizing the dataLayer. But, here’re three typical examples of how it can be used:
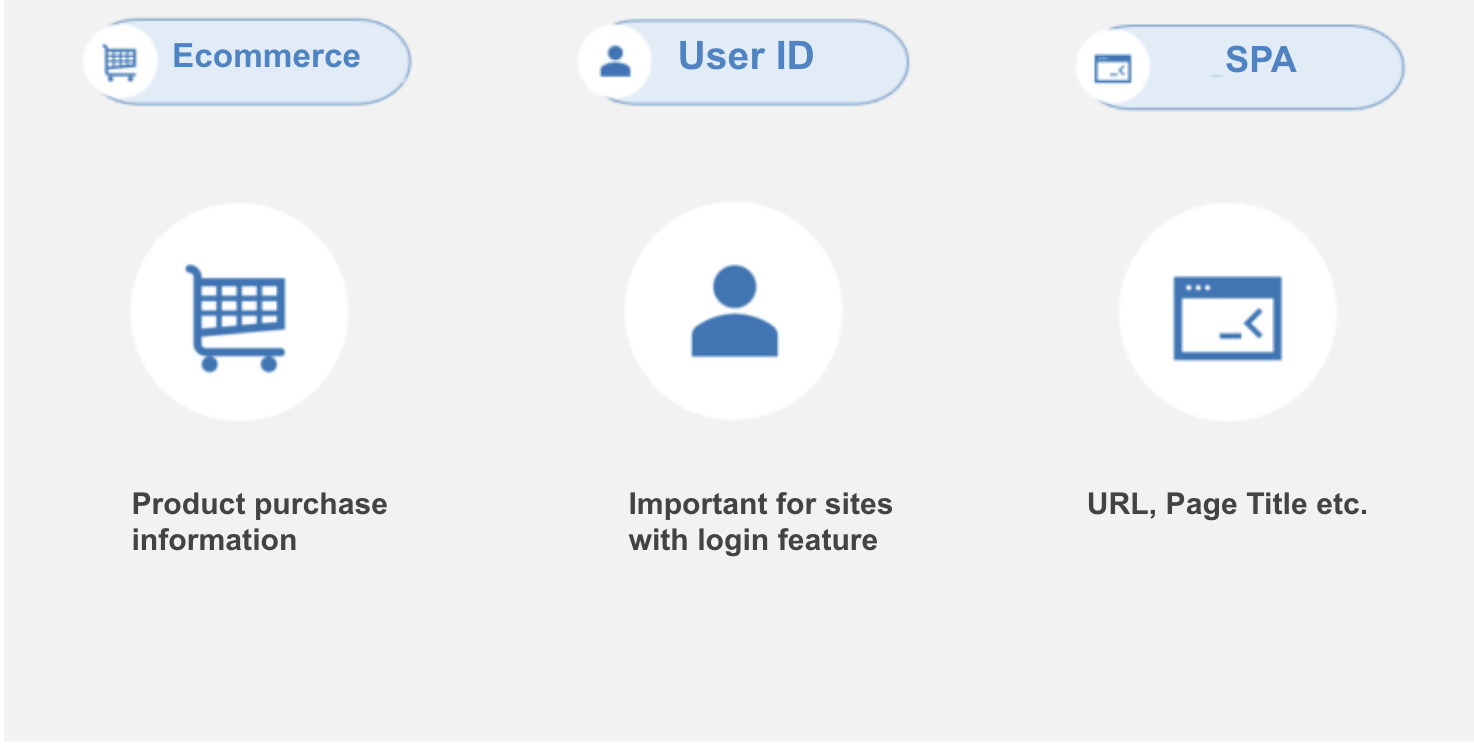
We will not delve into the details of these use cases, but if you’re interested, please do give it a try
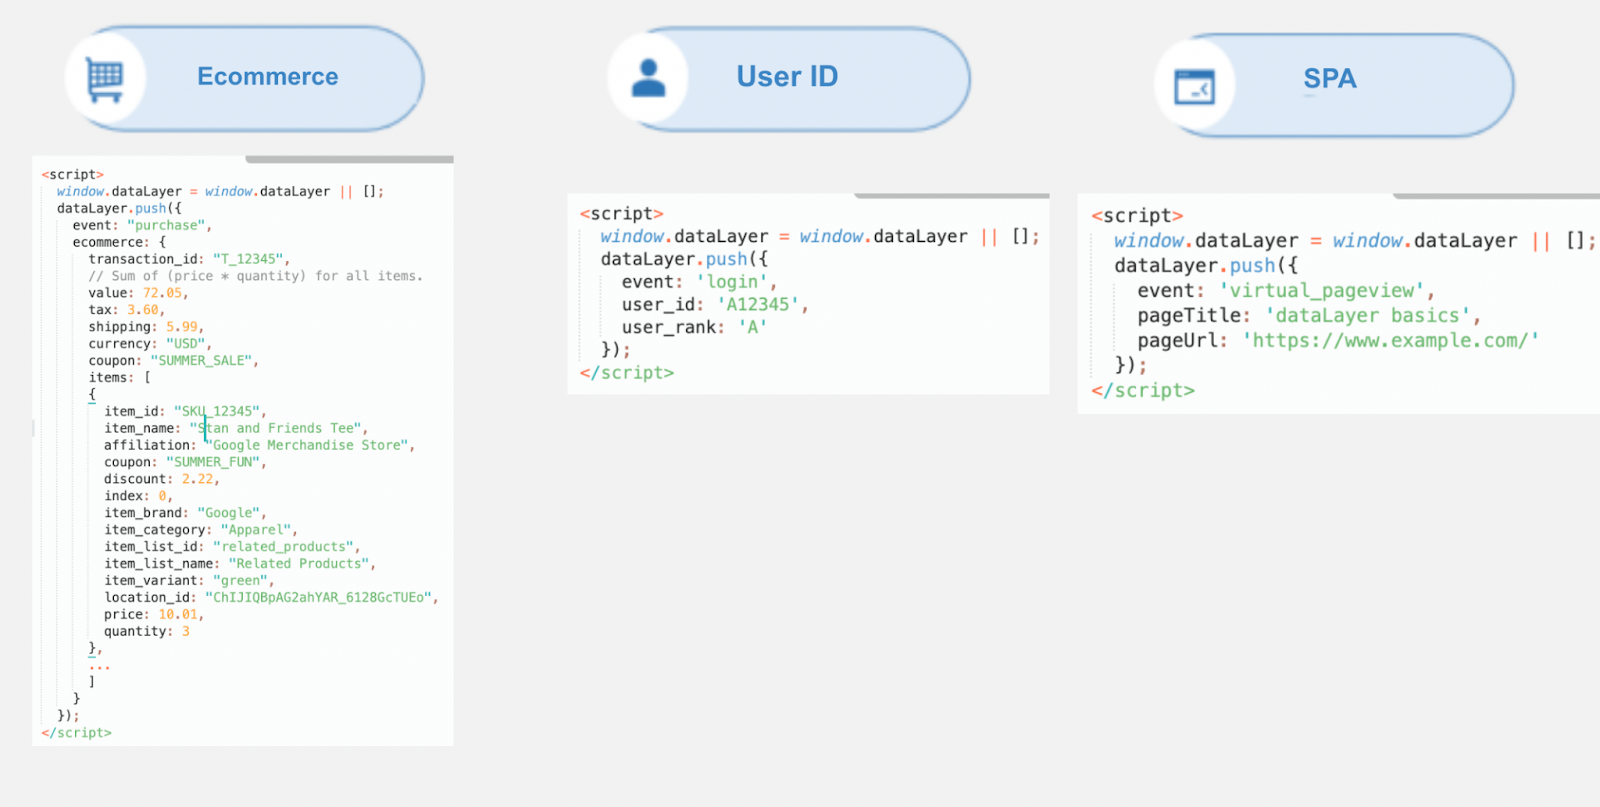
Sample code for use cases
Summary
We’ve explained the concept and how to use the GTM dataLayer.
Here is a summary of this article:
- The dataLayer is a “box” of data for GTM to function.
- Data used in GTM can be added from pages or GTM itself.
- Implementing allows for the addition of data not present on the page.
- The data that can be added are “variables” and “events.”
- These are often used for acquiring e-commerce and user ID data.
- The dataLayer is the most important concept for GTM, and without it, GTM cannot operate.
Furthermore, by adding custom data, it becomes possible to freely measure data not present on the page, expanding the scope of analysis.
Understanding the dataLayer might be difficult at first, but let’s start with simple implementations and get used to it.